This is not an update to the 1 by 1 engine I've been tracking, at least not exactly. I didn't do much to the cam shaft at all this week. Last Saturday, I concluded my update by saying it should be done "tomorrow" - meaning last Sunday. Nope.
I did some more reading and decided the cylinder I'd been turning (more precisely called a journal bearing) needed to be not only reduced to the right diameter but almost left with a polish. That means sandpaper. I did some research and found that the most common way of getting sand paper into a place like that and minimize the chance of repeating my finger injury (or worse) is by gluing sandpaper to a Popsicle stick. Well, there's two of us in this house and neither of us eats Popsicles so it became a question of how I got one.
While sitting in the shop, I almost put my arm on my 3D printer when my brain said, "it's a plastic Popsicle stick maker." And so began a week of misadventures. A comedy of errors that, like most of them, wasn't funny at all.
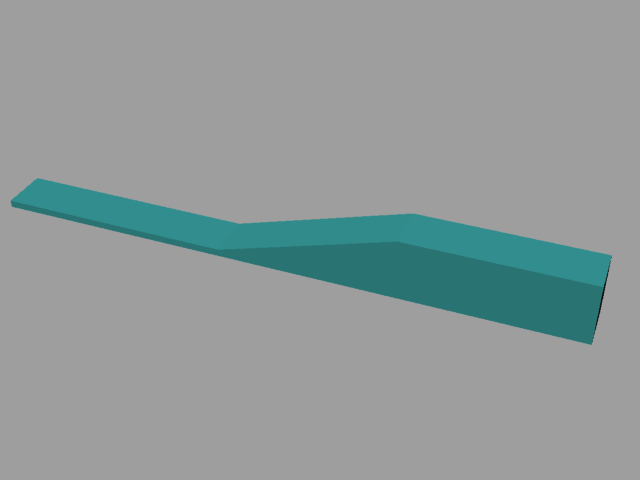
If I'm going to print anything, I need G-code file and to get that, I need a 3D solid model of a Popsicle stick. This didn't take long, and I quickly made a version 1 of what I started calling the Fat Popsicle Stick - because I wanted to put a nice handle on it.
So Tuesday it was time to print it. The print failed. I watched it for the first few minutes and came in to do other stuff during the remaining hour the print would take. Just as I was about to go check on it Mrs. Graybeard came in to tell me the thin, stick part was off the table. I went out to check it out and figure out what to do. I thought about putting a spot of glue under that end and pushed on it to see how flexible it was. When I did that, I popped the whole stick off the print bed. No choice left but to kill the job.
Except that it was about 3/4 done and probably usable. So I gave it a try and found two problems. First, it was too wide. The design was 0.40, but it came out a little wider. When I wrapped sandpaper on it, it was too close to the .438 of the journal. The second problem was that it felt too flimsy.
Within a few minutes, I had a redesigned "Ver. 2" stick ready to print. I doubled the thickness of the stick portion to 1/8" thick. Stiffness in bending here is proportional to the fourth power of the thickness, so doubling the thickness should make it 16 times stiffer. The minor change was to drop the width to 3/8".
Except that I noticed before I left the first time that it looked like the right front corner of the print didn't look as opaque as it did farther away from that corner. I ran one of these bed level tests like I did when I was getting set up to use the printer and it came out that the right front corner didn't print. Time to re-level the printer bed. Except I realized I didn't remember how to go through the process of leveling the bed, so I gave up for the day.
Of the various channels I found on YouTube, the one I think I got the most from was CHEP, so I went to his channel, searched on bed leveling, and found a video that was dated a month ago. Obviously not the one I watched back last January, but I watched it and thought it was a big improvement over the way I did it. The main difference is that the previous video is based on sliding a piece of paper out from under the print head while this one is based on a feeler gauge. The 3D printed gun guys stress doing a better layer thickness calibration and I think they talked about using a feeler gauge.
To do this calibration, I needed to load some new firmware onto my printer, which required that I verify which processor board revision I have. I'd been meaning to do both of those things anyway.
With the new firmware and the bed leveled, it was time to print the revised design. Except that I hadn't put the Rev. 2 model's G-code on my memory card and printed Rev. 1. OK, time to really print Rev 2 and very quickly found a problem. The G-code was having it print the 1/8" thick part but left it the original 1/16" in the back. Then it went back to print the handle on top of that thinner area and it didn't even attach to it. A real mess. I ended up with two parts not really attached to each other.
Between the first layers looking thin, and the layers not bonding well when I printed the squares to check the bed level, I started to doubt this brand new yellow filament. So I removed it and put in the other new spool of PLA+ filament I have, this one white. I started printing with that and then broke for dinner. After eating I went to check it and found it had printed the bottom half of the 1/8" thick part and then got lost. The extruder went the width of the stick up in Y and some random offset to the right in X. Totally FUBAR. It left me puzzling over which piece of software screwed up or if it was the printer hardware. There's three possible sources of software errors: the new firmware in the printer, the slicer software that creates the G-code, or it could be that my CAD model had defects I can't see.
I decided to start everything over from scratch, except for leveling the bed. I redrew the model and sliced it with the other slicer software I have but switched away from, Cura. That required me to convert the model to metric in Rhino. That's not hard, just more to do and not having to do that is one reason I switched to the newer (to me) slicer software, Prusa. Then I started printing it again. This one worked fine and was done in an hour.
If you lost count, I had to print it three times to get one to come out right. The one that came out in two pieces is usable, I had to cut off the loose filament and glue that one together. I now have two of the sticks that I think will work and that's all I need. One will get 400 grit glued to it and the other will be more like 1000. Maybe. Probably?
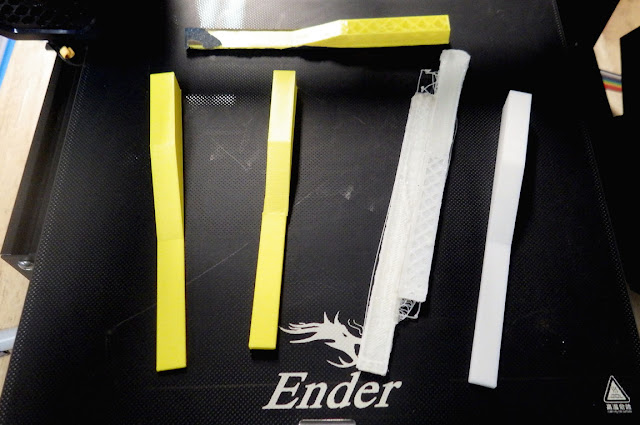
The Fat Popsicle Stick family. In the back is the Rev. 1 stick that popped off the bed before it was done, but was usable - except for being too wide. It has 220 sand paper glued to it and I actually ran that on the journal for a little while. The one on the left is the second Rev. 1 that I printed accidentally. Second from left is the first Rev. 2 that printed in two pieces. I shaved all the loops of filament off the bottom of the back's top piece and glued it to the bottom. The odd looking white mess is what came out of the printer losing its X and Y coordinates. The last one on the right is the finished Rev. 2 stick that printed properly.
Back in March of '17, I quoted an article from Machine Design magazine, "Are 3D Printers Overrated?" in a post for those of us who don't have one. The author's point was that you can buy a 2D printer (better known as an inkjet or laser printer) set it up and get great results instantly. Go buy a 2D printer at your local office supply store and you'll be printing out grandma's recipes in less than an hour. 3D printing is still a much, much less established technology.
I've had several prints that went without a hitch, but days like this week remind me of this guy's article. Yet another thing I've been thinking of doing is building an enclosure for my printer, which is his first recommendation.
I've been following several people talking about 3d printing.
ReplyDeleteAnd the answer to having a good print seems to be to just be satisfied with the printer you buy and don't expect to be able to upgrade it much past it's present capablilities.
And that the programming and the equipment have not advanced much past where they were 15 years ago. The potential is there, with better motors, better hot-ends, better everything, but for consumer grade stuff, the market is still dealing with Model-T level of engineering when it should be at the fuel-injection era level of engineering.
The jump from 'consumer grade' to 'commercial grade' is huge, expensive and deals with proprietary everything so the average 3D monkey can't futz things up by changing out thingamajigs and doohickeys.
And the price difference between 'consumer grade stuck in whatever hell was 15 years ago' and 'professional grade monkey keeps hands off of the pieces parts' is ridiculous.
Oh, well.
I've watched as others have had 'fun' with 3D, then gotten annoyed, then done the hot-rodding thingy and gotten even more frustrating, and then just sold everything at a loss and gone back to standard machine shopping. For all the reasons you have above. No progress in equipment really, no new tech, no really new products or supplies or anything.
Which sucks. Still an interesting technology, but...
A popsicle stick with sandpaper glued to it? Sounds like a nail file to me.
ReplyDeleteGo talk to your wife. Or search for “nail file fine” on Amazon.
Popsicle sticks can be had by the bagful in the arts and crafts aisle. Tongue depressors might be harder to find retail.
ReplyDeleteI agree low-end 3D printing is disappointing, but on the other hand, laser cutters! Kerf on acrylic (PMMA, Plexiglas, Lucite, Perspex) is narrow enough the pieces almost re-weld. Cut 1/4" plywood for dovetailed boxes with detailed graphics. Cut cardboard for cradle inserts for shipping fragile items. Mark acrylic by less heat giving a sandplasted etched look, or removing black spray paint from back surface. Mark aluminum by bleaching anodizing dye. Mark stainless steel by laser over spray moly lubricant.
and paint stirrers at hardware / paint stores.
DeleteI follow the r/3Dprinting and r/fixmyprint subreddits and based on what I've read there, and my personal experience with Cura, some of the versions of Cura (4.0.x I think) have a problem with occasionally putting a layer shift into the gcode. I just switched to ideamaker and find it much better.
ReplyDeleteMy bet is that the width of the Rev. 1 stick could be easily reduced with a little coarse sandpaper. But that is not as much fun as playing with a 3D printer...
ReplyDeleteThat's too much like the old, "mill at will, file to fit." I want it to come off the machine better than that.
DeleteThat thing sounds like it makes headaches real good.....
ReplyDeletePeople have made cool little toolpost grinders out of these- might be just the ticket.
ReplyDeletehttps://www.harborfreight.com/120-volt-circular-saw-blade-sharpener-96687.html
How are you going to hold the abrasive stick so it is dead square to the lathe axis? Can it be held in the toolpost?
ReplyDeleteI don't see why it needs to be dead square. People tear off strips and just wrap a loop around the rotating work to sand to uniform diameter.
DeleteIn this case, I used the three sanding sticks. The first one that was too wide with 220 grit, the assembled one with 400 and the last one with 1000. The smallest diameter is .3751 and largest is .3752, by my micrometer.
Looks like if the sanding stick is not dead square to the axis, the shoulder of the eccentric rectangular barstock could hit it on rotation?
DeleteThat's kind of self correcting. I had one of corners of the rotating bar closest to me hit the sides of the stick a few times, but I just corrected the position. I kept it moving side to side to keep it wearing evenly and moved it front and back to keep fresher paper on it. It can go a few inches in toward the work and back.
DeleteUsing cut (not torn, this deforms the paper backing) sandpaper strips for rotating parts tends to work better than the stick method. Switching to the abrasive plastic scrubbie pads (cut in strips) for final finish works well. Paint/bodywork supplies for those pads, as the ones in cleaning supplies tend not to be good enough on metal.
ReplyDeleteI understand that the process is part of what you are working on, but the smart@ss in me says "stop at 7-11 and treat yourself to a frozen dessert."
ReplyDeleteI've got a Creality Ender filament printer sitting in a box with two rolls of filament on top, just waiting for the time. The uPrint printer in my office uses proprietary software that I haven't had time to set up or learn, and it takes quite a while for the heated chamber and bed to heat, so it's not good for a quick print anyway. I am hoping the simple Ender will be usable by my kids and that they'll 'graduate' to the pro machine in time.
Keep up the effort, and glad your hand is healing.
n