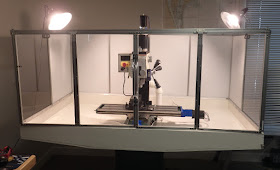
The Grizzly G0704 is one of the most popular mills in the hobby market. It offers a good combination of features: a motor that might actually run 1HP, a decent work area; 6-7/8" of Y travel and 18-7/8" of X. The Z-axis lifts 11". Plus, it comes at an attractive price, $1250 today: 4/23/17. It has become a popular machine for conversion to CNC for home hobbyists, with most people using at least some of the plans at http://migration.g0704.com/, created by "Hoss", Daniel Kemp.
There are also other ways to do this: Automation Technologies sells two different kits of the parts (with the Y axis motor mounted on the front or the back) so that you don't have to build as much as I did. I used their stepper motors and controllers, but gathered all the parts and built my own controller box. I bought the ballscrews from LinearMotionBearings2008 (Chai is the guy to talk with) and built my own motor mounts, ballnut mounts and all the other metal parts I needed.
A project as large as this deserves an opening "introduction" and conclusion - to the degree that a project as large as this is ever finished. The introduction is the first post in this series
June 7, 2015
Introduction; explanations of what I'm doing and the start of the project
September 26, 2015
A trick on the lathe for threading
October 17, 2015
Cutting pieces
November 18, 2015
The CAD/CAM process
February 26, 2016
GCode for cutting a motor mount with video
March 9, 2016
Leading with my mistakes - I screwed up a piece
March 12, 2016
Followup wherein I clean up my mistakes
April 6, 2016
I change directions and start over. This is the start of phase 3, the way the conversion proceeds.
April 17, 2016
Rough cutting all the new phase 3 parts
April 20, 2016
Making parts for the new phase 3 approach - a puzzle on the X-axis ballnut mount
April 22, 2016
The answer to puzzle on the X-axis ballnut mount
May 1, 2016
Just the last paragraph - cutting the Z-axis ballnut mount. The rest is financial.
May 8, 2016
Boring the Y axis ballnut mount
May 13, 2016
Boring the Z-axis ballnut mount.
June 4, 2016
Issues with the Z-axis ballnut mount and fixing them.
June 8, 2016
More work on the phase 3 pieces
June 15, 2016
A wrap up of cutting the metal
July 7, 2016
Redesign of the X-axis cap
July 13, 2016
The new X-axis end cap is prototyped and will work
July 18, 2016
All of the parts for the phase 3 conversion are completed!
July 24, 2016
Setting up to powder coat the metal parts
July 27, 2016
First parts painted
July 30, 2016
Finishing painting the parts
August 5, 2016
Top level assembly work - prepping the Y-axis ballscrew
August 8, 2016
Work on the chip tray.
August 14, 2016
Completion of the chip tray
August 22, 2016
Modeling the shop layout
September 4, 2015
Update of the shop featuring a rolling base on the G0704
September 10, 2016
A milestone - getting the computer to run the motors on the benchtop
September 18, 2016
Modeling the controller box
September 27, 2016
Modeling the controller box back and bottom panel
October 3, 2016
The controller box mostly built
October 4, 2016
With Hurricane Matthew bearing down on us, I continue to cut out the DB9 connectors on the controller box back panel
October 17, 2016
More controller box
October 25, 2016
Controller box works on its first test - complete with moving motors
November 1, 2016
The controller box is done. And it's (part) orange.
November 16, 2016
Tear down and rebuild of the G0704 begins
November 20, 2016
Setting up to mill the oil channels
November 29, 2016
Talking about the scariest hole in the whole project -1/8 diameter and 4" long; trouble with the Sherline mill helping build this
December 10, 2016
Got the Sherline mill fixed, so back to cutting metal
December 20, 2016
Drilling the scariest hole in the job and overview of the way the oiling system is designed
December 22, 2016
The ballnut removal tool saga - for installing the Y-axis ballscrew
December 29, 2016
Plumbing fittings in the cross slide
January 3, 2017
Attaching oil fittings
January 13, 2017
Tear down stories - repacking the spilled balls out of a ballscrew, or "reballing the nut"
January 17, 2017
The mill torn down to a base, a Z column on it, headstock on a bench, then rebuilding begins
January 17, 2017
The Z-axis moves under CNC control - while the mill is apart
January 25, 2017
Starting reassembly and oil system clearance issues
January 29, 2017
Oiling system clearance problem fixed and more debugging
February 1, 2017
The XY table is moving
February 2, 2017
Construction is complete! The mill moves and works
February 8, 2017
Tweaking and improving the mill begins
February 13, 2017
Tweaking and improving pt 2
February 18, 2017
Modeling and designing the enclosure
February 25, 2017
Working on the enclosure
March 1, 2017
Cutting some enclosure pieces on the mill under CNC control
March 8, 2017
Building the enclosure
March 14, 2017
Enclosure at 90%
March 20, 2017
Finishing the enclosure and some other notes
March 29, 2017
Oiling system running properly, and the choice between misting and flooding coolant
April 15, 2017
Setting up to install the Fogbuster
April 19, 2017
Running the Fogbuster for the first time
April 24, 2017
Concluding notes on the project.
May 16, 2017
Adding a Rotary Axis to the CNC G0704
September 9, 2017
Demonstrating a pendant to control the mill, implemented with a Logitech Rumblepad 2 game controller.

No comments:
Post a Comment