Showing posts sorted by relevance for query breedlove. Sort by date Show all posts

Saturday, April 25, 2026

My other, other stuff going on

I occasionally mention other things I'm working on or that are going on. Life is the simplest word and I think it was Beatle John Lennon who said, "life is what happens while you're busy making other plans." That's what this little post will be about.

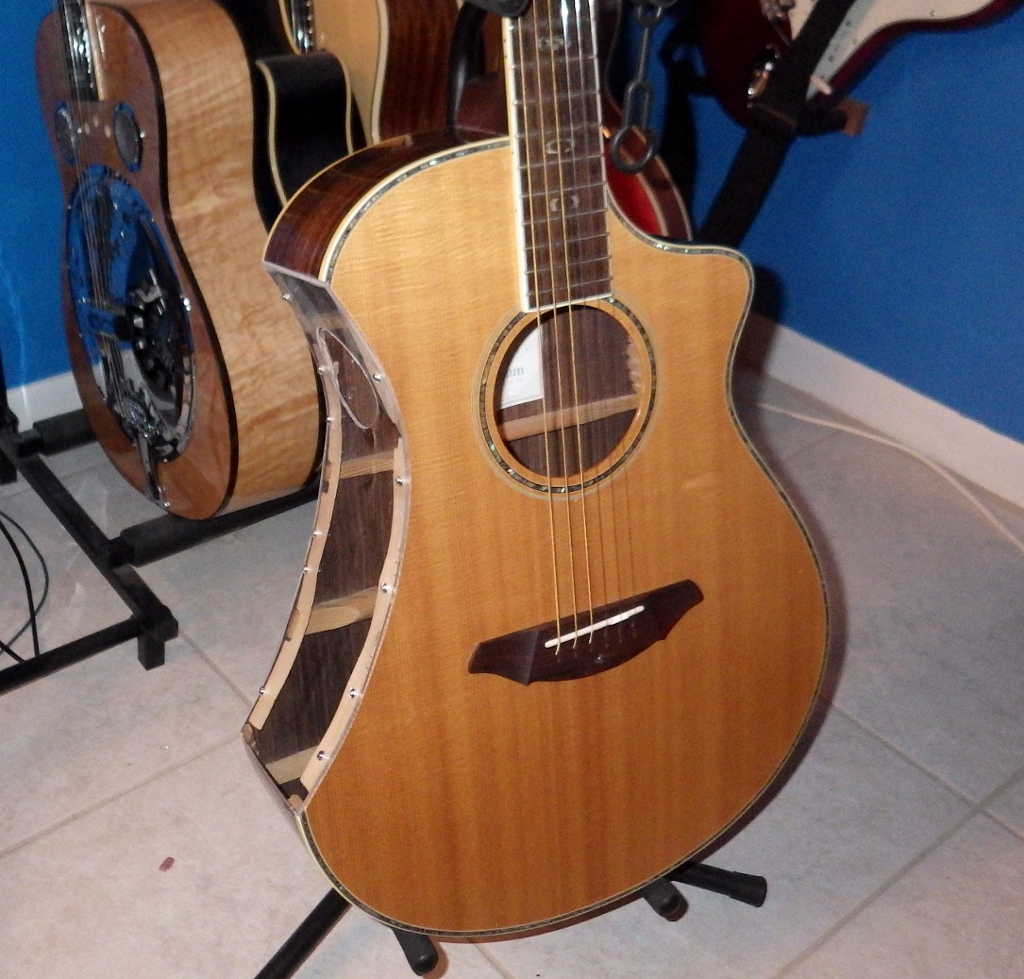
Let's start with something I haven't talked about in a long time: guitars. I've got a small batch of guitars, like pretty much all players who can get more than one instrument tend to. Unlike the vast majority of home players, I built two of those guitars; an electric guitar from a kit back around 2015, and an acoustic that was more like a very extended repair job. It was a sales demo model from some guitar store and before sending it around to show what their guitars looked like inside, the manufacturer, Breedlove, sliced most of the left side of the guitar off. 

The long story is I started playing in junior high school, around 1967 or '68, and like most others, I learned what was referred to as rhythm guitar. Playing chords. I played in a couple of garage bands, and at a couple of parties, but I never really fantasized about being a musician. It was enough to make some sounds that didn't hurt people's ears or they even actually enjoyed. 

In my "young adult" years, through my 20s, I hardly played at all and didn't get involved with guitars again until maybe 1988 or later. I picked it up with intentions to practice more often a few years ago. Those plans would get derailed every now and then by either an injury or osteoarthritis. Over roughly the last year, that second one had me unable to play for a year or more. The effect of the arthritis was limited entirely to one finger, my left hand's middle finger. The very last segment of that finger, the one that you press onto a string to change the note you're playing, rotated left or toward my pinky finger. 

How much did it tilt? I don't really know how to measure that with what I have, but I'll estimate 10 degrees. The rotation wasn't the issue so much as the insane pain it caused. I'm gonna bet you've heard someone say, "it hurts to look at it?" Exactly.

About a month ago, I realized that I had bumped that finger on something and it didn't hurt. After some time trying to figure out if it was really gone, I started thinking what I could do to test it. I picked up one of the guitars I'd regularly practice with and found I could play without the insane pain.  The problems now are the same ones everybody picking up a guitar and starting to practice faces. Building up calluses on my finger tips so the strings don't hurt as much, strengthening the muscles involved so when I go to play some chord that makes all six strings sound, I can apply even pressure and put all the strings on the neck. Most importantly though is agility of those fingers, and knowing what to play. As in re-learning a few songs. 

My tendency in here is to put up some picture that's relevant or related to the topic, but tonight, I was going to link a video from Woodstock that I've run before. The problem with that is YouTube has decided we're not allowed to embed it, but I think I can run a link to it HERE. And here's a picture:

A photo of my repair job on the Breedlove guitar. The guitar is on my workbench but just for posing, in the final post on this job.  

The finger has better and worse days, so it's not entirely being back to normal and I have no way to know if that's even possible.


Wednesday, June 21, 2017

Now for Something Completely Different

About a year ago, I told the story of a guitar project I was starting on.  To summarize, a friend had given me an odd "junk guitar" with most of one side cut away.  The story is that the manufacturer, Breedlove, had made it as some sort of demo piece that showed how well they were made by showing what the insides of the guitars were like.    
It has a solid Sitka spruce soundboard (top), which isn't uncommon once you get past the very cheapest guitars; the back, though, is solid rosewood and that's something I expect to find only in fairly high end guitars.  The closest equivalent I know of on the market today seems to be the Fender Paramount PM-3 Deluxe at a K-buck.  The sides are rosewood laminate (plywood), but a guitar's sides are largely structural and don't affect sound very much. So while it has an obvious problem, it's basically a good guitar, not one of those cheap, plywood guitars for beginners.  In other words, while it's a junk guitar because of how it was cut up, it's not a "junk guitar".

Last September, I replaced the missing parts (with the exception of the electronics) to make it playable, and I've been playing it at least once a week as my primary acoustic guitar.  It sounds remarkably good.

All the while I've been trying to come up with a way of restoring it.  The problem is that the shape of that cutaway isn't a piece of an oval, a circle, or anything that looks like a conventional guitar's waist.  I'd have to turn the cutout shape into something I could match exactly to make a solid top with the right shape, and I'd have to rebuild the top and back.  I might have to remove the neck.  I'd need to replace many of the braces inside the box; you can see some of the braces on the back; the braces on the top are a more complex pattern and really a science of their own.  Getting the wood to rebuild the top and back would essentially mean buying the wood to make a whole new guitar, and it would probably take more work than making a new guitar from flat pieces of wood.

What about just putting a piece of wood over the hole?  I started looking into that and found it to be harder than you'd think.  The wood used in guitar making is very thin compared to standard lumber, which has lots of advantages, but means you just don't find it at the Orange or Blue Borgs, you have to buy it from a luthier supply place.  After you find it, the wood's typically sold as a separate top and another species sold as the back and sides.  From time to time, during thickness planing or sanding, a side will get broken and the remaining piece set aside and sold as a practice or "orphan" side.  For a few reasons, I had decided I'd like a light wood, preferably figured maple.  The problem with that is the places who sell these orphan sides tend to say, "no selection"; "you'll get what we have the day we get your request".   One of the major online suppliers told me they'd be happy to sell me two sides at full price, if I'd like, which came across as less helpful than they might have though. 

Somewhere along the line, somebody suggested I replace the side with a piece of clear plastic.  The guitar will always be an oddball, one-of-a-kind instrument, so since it was originally intended as  a showpiece of what it's like inside a Breedlove guitar, this will keep it that way.  I finally went down this road, using some clear plastic left over from building my mill's enclosure.

Since holding the plastic to the guitar has to be designed in, I decided to use pieces of wood called kerfing, for the multiple saw kerfs cut in it.  The first step was to cut this into pieces and glue them to the top and bottom of the body, emulating the way the existing kerfing is positioned.  This picture shows the bottom kerfing already glued in place and the top kerfing being held by rubber band clamps. 
With the kerfing glued in place, the next step was to rough form the plastic.  I made a form by tracing the outline of the body's cut onto some scrap 1x pine, cutting that out with a jigsaw and then smoothing with sandpaper.  After that, I clamped the plastic to the high spot on the form and heated it with a hot air gun.  As the plastic softened, I could push it down onto the form with a long-bladed screwdriver and after a few seconds, it won't spring up anymore.  Much.
Then it was time to go through a cycle of test fit, mark overhang on the plastic, cut it off, and repeat.
As you can see, I put a sound port on the side, like so many high-end custom guitars have these days.

Finally, the real purpose of the kerfing.  In a production guitar, the sides are glued to the flat surfaces on the kerfing.  I thought that for this guitar that it might be best to use wood screws on the sides, because wood glue doesn't work on plastic and epoxy is too permanent.


I suppose it's typical for me to say I'm not sure if it's Done done.  Before I smoothed the plastic to make it match the body's top and back,  I put a new set of strings on it and played for a half hour.  Adding the side didn't mess up the sound, that I can hear.  With the sound port where it is (even though it's not perfectly centered - aarrgh!), it still sounds good from where I'm sitting.  The second thoughts that I have about being done center on how butt ugly it is.  I might do something like stain the light colored wood of the kerfing to make it a bit less glaring, and in-your-face.  I need to learn a bit about options and what I can do to make it look a little nicer, if possible.

On the other hand, it's not like I'm playing in clubs and lots of people will see it.  It'll be under my right arm and held up against me while I'm playing.  Then it will live on a stand until the next time I pick it up.


Wednesday, September 21, 2016

My Little Side Project

Back at the start of June, I posted a little piece about a friend gifting me a junk guitar.  It's a Breedlove that was made years ago and that apparently was some sort of a sales demo.  (There's a label inside that says it's an Atlas Series, and while I can find mention of that series in many places, no mention of when they were made.)  It was missing easily replaced pieces, and had a large chunk of the left side cut out of it so that potential buyers could see how it was made.  The original was an acoustic-electric with a nice electronics package that went away at some point over the years.

The idea is that it's about as broken as broken can be, so I can mess with it with complete impunity.  Pull frets to learn how to replace them?  Why not?  Crack the sound board to see if I can fix that crack?  Steam the neck off?  I probably can't break it worse than it is.   Naturally, I said, "sure I'll take it".

It has a solid Sitka spruce soundboard (top), which isn't that uncommon once you get past the very cheapest guitars; the back, though, is solid rosewood and that's something I expect to find only in fairly high end guitars.  The closest equivalent I know of on the market today seems to be the Fender Paramount PM-3 Deluxe at a K-buck.  The sides are rosewood laminate (plywood), but a guitar's sides are largely structural and don't affect sound very much. So while it has obvious problems, it's basically a good guitar, not one of those cheap, plywood guitars for beginners.  In other words, while it's a junk guitar, it's not a "junk guitar".

When I got it in June, I said:
My mental gears are turning.  I'm curious about how it sounds now.  I could get a set of tuners, nut and saddle and have it able to make sounds for under $100 - maybe half that if I use no-name parts. That's probably necessary, too.  I mean, I can't tell if I ruined a setup, or added a fret that buzzes unless I can get sounds out of it.  The foot long hole in the side will be a problem, but I can live with that.  Actually, several custom luthiers make guitars with a solid body and the sound hole moved up to the top edge, making this example an extreme version of this approach.
It turned out that the cost was way below $100.  $27.06  to be precise.  I bought a set of no-name import tuners on eBay for $8.06 - including shipping - and a pre-notched, nut and saddle made from "bone" for the other $19 (it doesn't say what the bone is from, but "bone" is a commonly used material for these parts).   I bought those parts before my medical emergency back in late June and they've been sitting.  I finally got around to installing them over the weekend.
This view shows the "oversized top edge sound hole" as well as the bone saddle... 
while this view shows the el-cheapo tuners and nut. 

Perhaps unsurprisingly, it did require a little adjustment when I put strings on and tried to tune it up.  Certain notes around the middle of the neck didn't play; I'd try for the 6th fret and get the 7th fret note. The neck of a guitar is supposed to be slightly lower in the middle frets than at the nut or back at the body.  I just needed to adjust the truss rod a little to get it to play easily.  The rest of the fret board seems fine; no buzzing sounds which means the frets are probably fairly flat and level.  That's a little surprising in a demo piece like this was. 

Just why they cut this one up is hard to know.  I mean, did they cut up QC rejects that were destined for the trash bin, were they pulled from regular production, or were they made especially for this purpose?  I was a bit afraid that when I put tension on the strings that the whole thing would collapse like so much cardboard; or, at least, the bridge would go flying.  Everything is fine, though.  It actually sounds pretty nice, even with that large chunk of side missing.  It points the sound up at me somewhat better than across the room, so I'm sure it sounds different from where I'm sitting than where Mrs. Graybeard is while I play.  Hey!  Not bad for $27.  


Tuesday, November 7, 2017

A Little Update on Son of Side Project

I don't want to jinx myself, but I could be getting into the last little bit of the project I call Son of Side Project; adding a wood side to my Breedlove demo guitar that was introduced to Mr. Bandsaw and hasn't been complete in perhaps a decade.

In that last update, I had gotten to the point where I was ready to glue on the internal wood strips (kerfing strips) that would hold the side.  I eventually got those glued in place.  I had some issues with a couple of pieces of it shifting before the glue would hold it.  As a result, I had to learn how to loosen fish glue and re-stick the pieces.  I replaced one.
Once the side was glued on, I took it down to my friend who has a fixture designed for routing the top of the guitar to add the trim binding strips.  The fixture uses a small, trim router and ball bearing collars to allow an exact width and depth channel to be cut.
This is how I brought it back last Wednesday.  There was an unfinished end like that on the front and back of the guitar where we didn't push the router too far.  So how to cut those off and extend the channel the rest of the way?

Rather than try to do this with power tools, like the rest of the channel for the binding, I went for hand shaping the wood.  I clamped a piece of wood to the top of the guitar as a guide and used a 1/4" wide woodworking chisel.  I cut straight vertically leaning the chisel against the guide to form the back wall of the channel.  The flat back of the chisel would form the new back, and I pushed the chisel in a little at a time (no hammer!), then went in parallel to the top from the side taking out small chips to remove the spruce I had just scored with vertical cuts.  It's a lot like chiseling out the waste in a dovetail joint, parts of a mortise, or pretty much anything. 

This picture is preliminary, before I finished cleaning up the channel, and it's magnified much more than I was seeing with Optivisors on (which is why I took the pic).  That step from top to the floor of the channel is 1/16".
Then it was time to start gluing up strips to try and match the colored strips you see in cross section in the corner.  I've done this a couple of strips at a time, and now have that top strip in place. 
The tape is in place as a "clamp" for 12 hours, so I can take it off in the morning.  There's a mess of to cleanup here, and some gaps that need to be filled with something or other.  The sides and back trim need to be done as well, but that will be simple compared to this top strip. 

Like I say, I don't want to jinx myself, but I'm making progress. 


Sunday, October 22, 2017

Son Of Side Project

Back in June, four months ago to the day, I gave an update on my side project, my Breedlove guitar.  At that time, I had put some kerfing strips in the side pieces in the gaping 14" hole in the side of the guitar allowing me to cap the missing side with a plexiglass piece and called it done.
Such projects are never "Done" done,  and it was mere hours before reader Raven prompted me in the comments to consider replacing that plexiglass with wood, and offered me a piece of scrap from his bin.  Son of Side Project was born.

Let me just say right out front that I don't know what I'm doing, OK?  I figure I'll make a few mistakes and eventually get there, but this is such a radical repair job that chances are pretty high that nobody has done a repair like this.  It's a training piece that I hope to learn a lot of things from.  Even more, I hope the things I learn will be useful on some future projects.  I have four or five books and I have a friend in town who is guitar technician/repairman.  He has been willing to share all the tools and techniques I can ask for.

Strangely enough, he found a useful video that contains ideas to emulate on my guitar, and I started down this road.  It took a while to get to this point, but by early August I had the side glued where my plastic side used to be and I was looking forward to trying to get that finished.  That's when I found the problem in the upper left hand corner of the side in this view.  At some point, the backing piece of wood I had in this corner broke out, falling into the body, and the wood had a little give to it. 
The rest of it felt solid, but that little piece is important because other things need to be glued to it.  My friend said, "pull it off and start over".  Gulp.

I had glued the side on with TitebondIII wood glue.  That's removable, although it takes a lot of managed heat and the proper mixture of delicate but strong touch.  The majority of luthiers prefer to use hide glues because they're removable with steam and joints are reworkable.  A little steam generator will loosen the glue and make removal easy.  I had to head back down to the friend, hat in hand, to use a heating pad he has for this sort of task. 

With the side removed, I came home, expecting to spend hours chiseling out the old kerfing strips to replace with new ones I ordered.  Thankfully, they removed easily with a combination of a very fine-toothed saw to cut open the glue-filled saw kerfs, wood chisels and a cabinet scraper.  (True story: I bumped the chisel into my finger and when I looked at it and realized it hadn't cut me down to the bone, said, "I need to sharpen these chisels").

Finally, with the back and sound board cut back to clean wood, it's time to glue in the new kerfing boards.  This is the top.  
That's when I found some damage in the guitar's body, in the lower bout.  From time to time, the guitar has fallen over, or taken a small beating on my workbench, and one time, a worse fall.  It probably happened then.  Not a big deal; if I have the glue out and clamps ready, what's a few more joints?   

I'm notoriously bad at estimating how long it will take me to do things, but it looks to me like I could have the new kerfing in place along with the replacement side by the middle of this week.  There's still a lot of work, because I have to duplicate this trim on the top edges.
The center, faux abalone shell, has the thin black border on it from the factory.  The two other black strips, the white spacers, and the two other white strips are all separate pieces of plastic. 

For this work, I'm switching to fish glue.  The main difference between fish glue and hide glue is that it has a longer shelf life, especially if you keep it in the refrigerator.   Like the hide glues, it's reworkable with steam, or even water.  This is where the products out of "primitive cultures" frankly amaze me.  Who thought, "you know, I bet if we put the left overs from the horse - hooves; ligaments, whatever - into some boiling water we could make some really handy glue"?  How much refinement was required to get today's hide glues?  Likewise fish glues.  This artists' site says fish glue is made from the swim bladders of sturgeons. Who guts a fish, looks at the swim bladder and says, "I bet I can make some glue out of that"?  I'm betting the answer is "no one".  I'm betting someone that was starving gathered up the fish entrails, heads and whatever they could and tried to boil it into a soup.  I can hear them saying, "this is the worst fish stew I've ever had! And look, the spoon is sticking to the bowl like it's been glued."  Yeah, I know; necessity is a real mother.


Sunday, December 31, 2017

Happy New Year 2018

New Year's Eve is upon us, and I just want to wish all of you a happy New Year.

2017 was my second full year of retirement and was better in a couple of ways than the first year.  The biggest was that the year was free of medical issues like my emergency gall bladder surgery in June of '16.  It was largely a year of doing what we felt like doing - the privilege of retirement.  We took two vacation trips, one to South Dakota for a week with the kids and Precious Grand Daughter; the other to Tennessee to see the eclipse and they met us there.  We currently don't have anything planned for 2018, so it's getting to be time to plan something. 

Retirement is a relatively new concept in society, at best a couple of hundred years old, and it's evident that society (in some sort of nebulous, society-at-large sense) is having troubles with it.  See "underfunded pension plans" with your favorite search engine.   

I was looking at last year's blog entries to see what I was doing a year ago, and most of my posts were about completing the CNC conversion of my Grizzly G0704 - a year ago this weekend, I was completing the plumbing for the oiling system.  I also pointed out traps and tripwires that Obama was leaving for Trump.  We've encountered some of them as the year has gone by.

I had the mill built into a functional mill, completely under CNC control by February 2nd.  That quickly turned into a couple of months of tweaking and  improving.   First was reducing backlash on each of the axes, followed by completing an enclosure made from 12mm aluminum extrusion and plastic panels from the local Borg (mostly the blue Borg, not the orange).  And no, I don't know where that nickname comes from, other than I think it was the old Usenet newsgroups (kids, ask your parents).

I can't say I was done, because as recently as a few weeks ago, I talked about improvements to the rotary axis I originally added last May.  I can still think of things to do to improve its usability and user friendliness.  Then came adding an oiling system, fighting leaks until I went over to manual oiling, and finally adding a misting cooler.  It's probably best to never think of a project like this as done.

Then, of course, there was my "Son of Side Project".  Originally, Side Project was a joke because the project was putting a new side on the sawed away Breedlove guitar.  The original side was plastic left over from making the mill's enclosure.  Son of Side Project was a sequel to Side Project to replace the plastic with wood.  Now, it has a quilted maple side where the plastic was.  I gathered up the tools to do a setup on it this week and now it plays quite a bit better.  The guitar was most likely a Quality Control reject, so it needed lots of work.  The frets were uneven and had to be leveled with a file.  It probably needs some additional work.  I know the $8, eBay-special tuning machines I bought for it need to be replaced. 

As far as projects with my CNC'ed, four-axis G0704 mill, I haven't accomplished much.  I built the GB-22 but never got it to function reliably.  It's still sitting as a "one of these days" project, in pieces.  I built the Little Machine Shop wobbler steam engine.  After drilling out the flywheel on my rotary table, I took the whole thing apart and put a shinier finish on all of the parts by lapping them on finer grits of sandpaper, and/or turning in the lathe's chuck.  Put it back together to find it doesn't run as reliably as it did.  I think I took too much mass out of the Flywheel.  I will turn a new one and get it back to where it was. 

In addition to my ham radio antenna project, I have another electronics shop project, a box for a component called a variac.  This will allow me to put lower voltages on older vacuum tube equipment, at least while I get it running the first time. 
The black rectangle on the top is an AC voltmeter/ammeter like one of these and the AC outlet on the front is still under consideration.  This is going to be like my controller box for the CNC 704, with the panels laid out in Rhino3D CAD and cut out on the CNC mill.  This time it will be cut out on the big system, though.

Aside from those two, I'm looking at more projects for the metal shop, with fewer involving guitar resurrection.

Happy New Year!  Remember, if you drink, don't text and if you text, don't drive.  Or something like that. 


Sunday, June 5, 2016

The Birth of Many Projects to Come

Last April,  I told the story of how I completed my kit guitar with the help of a friend who has worked as a luthier.  There's almost no limit to the number of tools one could get if they wanted to handle any work on their own guitars; the big guys seem to have a tool for everything and my friend has a lot of them.  I enjoyed the experience of learning how to do these things, and have made and acquired some tools that seemed useful, although I have a long way to go to having even a poorly equipped guitar shop. 

I've thought about learning how to do more, but the idea of breaking one of my guitars to learn how to fix it is, somehow, not very appealing.  I started to search eBay for a good deal on a broken guitar, just so I could learn how to make some repairs.  Even broken guitars seem to sell for over 50% of what a new one ought to sell for, and I find that the idea of dropping 2 or $300 on a broken guitar that - maybe - I could resell at what I paid isn't any more appealing.  So how do I learn?  I've chatted with this friend about this; he said he thought it was a good idea.  He got his experience in a couple of classes, and then fixing guitars for income. 

While we were out of town a couple of weeks ago, he emailed me to tell me he's got a guitar that he picked up from a store that was going out of business.  He said the guitar was in the way asked if I'd like to take it.  He said it was a Breedlove acoustic guitar and that it was some sort of a sales demo that had a chunk of side taken out of it so that customers could see how it was made.  The idea is that it's about as broken as broken can be, so I can mess with it with complete impunity.  Pull frets to learn how to replace them?  Why not?  Crack the sound board to see if I can fix said crack?  I probably can't make it sound any worse.  Steam the neck off?  Sure, why not.  Naturally, I said, "sure I'll take it".

I picked it up last night.  This morning, I started looking over the guitar in some detail.  It's actually a fairly nice guitar!  The top is solid Sitka spruce, which isn't that uncommon once you get past the very cheapest guitars; the back, though, is solid rosewood and that's something I expect to find only in fairly high end guitars.  The sides are rosewood laminate (plywood), but a guitar's sides are largely structural and don't affect sound very much.  I've heard the tone wood golden rule is first the top, then the back, then the sides.  When new, they look like this:
Now this one doesn't have any of the tuners (the gold-finish pieces on the head stock at top in this pic), and it doesn't have a nut or saddle (the white horizontal-ish pieces at the top of the neck, and in the dark piece (the bridge) on the lower part of the body).  It doesn't have the electronics that these came with.  Most importantly, the top and bottom pieces of the top edge (left side in this picture) have been cut away and the side is missing.  In a word, it's unplayable, but that's the point of getting it.  
My mental gears are turning.  I'm curious about how it sounds now.  I could get a set of tuners, nut and saddle and have it able to make sounds for under $100 - maybe half that if I use no-name parts. That's probably necessary, too.  I mean, I can't tell if I ruined a setup, or added a fret that buzzes unless I can get sounds out of it.  The foot long hole in the side will be a problem, but I can live with that.  Actually, several custom luthiers make guitars with a solid body and the sound hole moved up to the top edge, making this example an extreme version of this approach.  As I work up to it, I might try to restore that cutaway section.  There's a lot of projects there.  But first projects first: work continues on the G0704 CNC conversion tomorrow.


Tuesday, November 14, 2017

Three Days from Done?

Or done now?  My Breedlove is now presentable in polite company.  After determining that the cured polymer coating on it is insoluble and not going to be damaged by anything I can put on it, I bought a can of high gloss Minwax Polyurethane spray and did four coats today.


The wood itself is gorgeous.  It's quilted maple, stained with a mix of water soluble Transtint Dyes, blended up on a practice piece to see how I liked the color. Quilted maple reflects light differently with every move and that pattern is you see is only there with the light from that angle.  Despite looking wavy and almost bubbly, it's flat and smooth.  The wood was gifted to me by reader Raven, who offered it in reply to my late June post about putting a clear plastic side on this guitar.  Couldn't have done it without your help!

All in all, the finish looks pretty good, but not as "deep" or glossy as the factory finish.  The spray can instructions say to spray a light coat every two hours, and by the time I fussed over a detail that I didn't like, I got started close to 10AM.  Two hours after the third coat, I lightly sanded with 500 grit, cleaned with mineral spirits and shot a fourth coat.

My experience with the finish compatibility test over the weekend says this won't reach maximum hardness until late tomorrow at the earliest, in line with the can's warnings not to use the item for 24 hours.  Three days comes from the other instruction on the label saying:
Recoat within 2 hours. If unable to do so, wait a minimum of 72 hours, then lightly sand and recoat.
That says I could add more finish on top of what I have on Saturday.  My tentative plan is to try to buff the guitar with a mild polish.  Not rubbing compound but something beyond pure wax.  Tool Junkie Heaven for guitar techs offers electric buffers or foam polishing pads.  The pros use something like their buffing systems:
If the polish doesn't help, maybe I need to repeat adding three or four more coats on Saturday.

I can't do anything to it for now, so in the meantime, it's on to other projects.