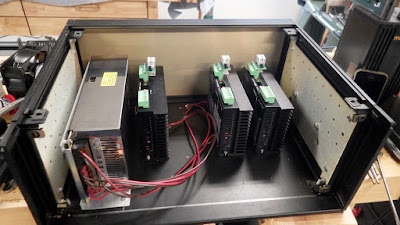
In the last week, I made some more progress on the CNC controller box. The bottom is done and I've been testing cuts that go on the back panel with available scrap. First the bottom:
The only major part missing when I snapped this is the breakout board, which will go closest to the back (viewer) on the right. I left a gap in the motor controllers to verify how the fourth will fit when I add it. I later moved one over so that the empty slot is on the right. The power supply (shiny box on the left) is held down with #6 hardware through the bottom. Screw, lock washer and nut. The three motor controllers are held down with #4 hardware into tapped holes in the bottom. That was just because of the hardware I had on hand.
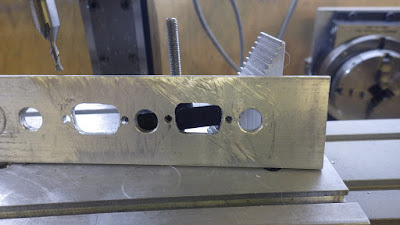
The back panel cutouts are hanging on the DB-9 connectors now. I found a CNC file online that's very easy to use and did a couple of runs of it. I had to modify it to cut in two passes and slow down the feed rates because of the light duty nature of the Sherline, but it ran with no issues. The DB-9 outlines came out too big, though. Here are two cutouts on a piece of scrap aluminum I had lying around. Turns out they're over 1/8" larger than the connector. You'd want some room around the connector shell but not that much. (Ignore the three large round holes. They're not part of this experiment). This is also low grade
aluminum; soft and gummy. The chips cling to the edges of the cut and
have to be filed away. I think that's part of why the cutouts look kind of
raggedy, too.
I realized that the reason the holes were too large was because the file was using cutter compensation and I hadn't set that up in the software (Mach3). Cutter compensation is supposed to automatically move the cutter a programmed value (the radius of the cut) inside the cut line and since no entry is interpreted as "0.000", the center of the cutter ran along the lines, not its outer edge. Which made the cutout too big. When I added the value, the software gave me an error and wouldn't run. I reloaded the original file (without my changes)
and got the same error, which means the original file is the problem, not my edits.
This led me to decide to just code one up myself. I used a 1/4" EM instead of 1/8" and don't sweep the cutter in arcs in the corners. I just move the cutter from corner to corner and the radius of the cutter creates the curves in the corners. At least that's the plan. Do to other goings on around here, I didn't get to try out the code. I'll run that tomorrow. I do have to change cutters to drill the 1/8" holes on the ends, but that doesn't really require CNC. Just change the bit once the work is located.
As I say every time I post about the project, I work on this some amount virtually every day. Always trying to learn new things and solve a new puzzle.


At one time I had a DE-9 chassis punch, but it got lost somewhere over the years.
ReplyDeleteI priced one and just about had to change my shorts. Those little guys are anywhere from $700 to over $900 from the usual suspects!
The best price I've found was $325 for a new sealed-in-box Greenlee set.
Just glad I don't have to punch any holes that size.....
I never found one as low as $325. The best I found was like $525. $525 just ain't happening. I did see a DB-25 punch on eBay for $125, but that's still a lot for something I'd use once to punch one hole and then put aside.
DeleteI'll know tomorrow by mid-afternoon if my approach works. I suppose worst case is I use the file without cutter compensation and put up with bigger holes than necessary. It's really not critical, I'd just like to learn how to do better.
Draw it up in Fusion 360 and then tell the CAM what size endmill you are using.m it should spit out the proper G-Code for you. Or perhaps you can import the DB-25 dxf file into Fusion 360 and the do the CAM as before.
DeleteI didn't know what you were talking about, so I googled it...why the heck do these things cost so frigging much?! I mean...they don't look especially complicated...color me confused.
DeletePS: everywhere I looked, they called it a DB (as opposed to DE) 9 punch...was that a typo, or did I look up the wrong thing?
God bless! :-)
"DB-9" and "DE-9" are used interchangeably.
DeleteThe "B" or the "E" refer to the shell size of the connector. The "E" size shell is what's commonly used for things like an RS-232 serial connector, but back in the early days of the PC, they somehow started being called "DB-9", and the mistake stuck.
Ohhh. Okay, cool. Still, why the stratospheric prices? Are they just not made anymore, so they're rare? I mean... $500+ for a single die/punch? Thanks for answering, btw! :-)
DeleteI really can't answer that. Yes, they're very well made tools, but other well made tools are cheaper. It might be the steel is particularly expensive, the machining is particularly good and so on, and maybe it's just they don't make a lot of them and they charge what the market will bear.
DeleteI'd think that since most of the buyers are manufacturing shops, those shops could make their own if they thought it was cost effective.
Yeah, I was thinking the same thing w/ regards to shops making their own...I guess *someone* must be willing to pay that much for them, or they wouldn't bother offering them for sale, heh. Still...my goodness.
DeleteGod bless, and stay safe! I've never been through a hurricane (though I've encountered more than my fair share of tornadoes) but I imagine it's not exactly a bundle of laughs...I'll be praying for you and yours. :-)
Thanks. Prayers are appreciated. This storm's forecasts just keep getting worse. As of this evening, they have it going right overhead and skirting up the coast. Worst part is more of the models are showing it going off the coast of S.Carolina and then coming back for a second pass at Florida. Early to say where, but they seem to point more toward the southern quarter of the state.
DeleteWD40 works ok for aluminum cutting.
ReplyDeleteThe only problem with WD40 is I end up wearing more than the part gets.
DeleteI used Tap Magic after the first one and it reduced the amount of those chips that had to be scraped off.
Yeah, way out of my budget, too.
ReplyDeleteI have some templates that I glue down on the panel, and then drill some holes, and carefully file it out to size.
Chips sticking on the part? Tried doing a (light!) climb cut for a finish pass? Might have to go back to the 1/8" end mill so you can sweep around the corners to get away with it, But that lets you plunge-cut the holes at the same time. And throw in a chamfer by re-doing the finish cut with a different tool if you want to get fancy with it.
ReplyDelete