Showing posts with label 3Dprinting. Show all posts

Sunday, June 8, 2025

A strange weekend before an important weekend

Another reason to have a 3D (plastic) printer.  

At least a decade ago, we replaced our poured concrete back porch with pavers.  From where we sit now, I can say it was a silly fad the took away my common sense, because while the new porch was prettier for a few weeks, it takes about 9 Godzillion times the amount of work that the poured concrete took.  In particular, if you turn your back on them, the weeds that grow between the pavers grow so fast they'll overgrow and eat you.  (DISCLAIMER: it might be unique to Florida, but I doubt it.)

Roundup can be effective but hard to find, and the complaints about it are still high volume, although they are easing down from fever pitch (example).  I've switched over to Ortho's Ground Clear which seems more effective than Roundup and nobody is screaming about it and suing Ortho.  So far.  That I know of.

At least a week ago, maybe two, I sprayed every seam between pavers on the back porch.  They didn't all die back, for reasons unknown, so my plan was to take our ancient (seriously - like 20 year old) combo edger, grass/weed whacker and clean out every seam between pavers.  I got to it Saturday morning.  It worked for about a quarter of what I needed to get done before there was a snapping sound and the motor started revving too fast.  Like many weed whackers, it has a spool holding heavy monofilament line (like fishing line but much bigger diameter), and it's held in place by a snap cover.  That cover had turned into these two pieces.  The one on the right is an inside view of the cap that sits facing up on the piece to the left. 

The immediate answer is to go find a replacement part, but that's not easy on a Saturday.  Almost immediately, a voice in my head suggested I print a replacement.  Off to the Thingiverse to search for a Black and Decker edger snap spool.  I downloaded a couple and while I could tell they both were very close to the sizes I could measure here, I wasn't sure if they'd work with mine.  So I printed one up today. 

It printed for a couple of hours and must have taken something like 25 cents worth of filament, but by 6:30 tonight, I tested the fit and found it fit perfectly, then tested the whole tool by hacking back dead weeds for a few minutes. It worked perfectly.  

Tomorrow I plan to clean up the back porch and spray Ground Clear on anything that isn't alive.

I know I've said something like this before, but while a 3D printer might be a bit expensive to get started with, and require a bit more general familiarity with CAD software, and computers, until the Star Trek replicators that can turn the energy output of an atomic bomb into solid matter come around, these are the ultimate answer for those "need it right f**king now" plastic things that keep Walmart, and the People's Republic of China in business. 

The Big Deal is Next Weekend - if you're a Radio Amateur

If you reflexively hit the "CLOSE" button when you find I've gone on to do a ham radio post, especially about VHF and the 6meter band, go for that button and see you next time. If you're considering getting on 6m, this is for you.

This coming weekend, starting Saturday the 14th at 1800 UTC or 2:00 PM EDT, is the ARRL's annual June VHF contest.  Before I started chasing wallpaper on 6m, I played in that contest once or twice in the 1980s on 2m SSB on a transverter I designed and built.  It has always been the single best operating time for VHF in the US.  The ARRL does three VHF contests per year - this one, September and January.  Those have never been anywhere near as good as June; at least, around here.  With one exception.  The January contest is near the time of year when we get those few once-a-year chances to work Australia and New Zealand, although I've since worked other south Pacific stations in the winter and early spring. 

If you haven't gotten around to putting up your antenna, or have an idea for one you never built, I'm here now to tell you to go for it - you have five days to get ready.  I first tried the contest in 2002, after I discovered my HF log periodic antenna matched well on 6m - although it pointed kinda "wonky".  Over the years, I know I've mentioned this contest many times.  Two years ago, I worked Japan.  While trying to figure out how many grids I've worked in the USA, I've found several important contacts made in this contest after searching my log. 


Saturday, April 12, 2025

So Many Possibilities

Since the big story of the weekend appears to be sending Katy Perry and an "all woman crew" on a suborbital ride to the Kármán line, and how excited she is to be going on her trip, not much else is being talked about.  So time for a little side story. 

Within the last month or two, someone asked in a comment what's going on in the machine shop, since I haven't posted anything in quite a while.  I haven't posted much because I haven't been doing much with my machine tools, really only little repairs, or the occasional part or two to get something working better. 

As part of that, I seem to have dropped the engine I had started back in '21, called a one by one (or 1x1) because it's a one inch bore and one inch stroke internal combustion engine.  Putting it the way I did, ("I seem to have dropped the engine") underlines that this wasn't a carefully contemplated decision, arrived at by gathering lots of data, compiling that into spreadsheets used to figure what's the best alternative; it just happened.  There were several things that intervened and sucked up time on my big mill, notably tropical storm Ian in  '22 and Milton in '24.  The work after Ian involved totally redesigning the way my tower has been supported since I installed it in the early 1990s and was completed in June of '23.  

I've had to crank the tower over to work on antennas, most recently this past fall for tropical storm Milton.  It has all held together well.  

Again, these interruptions got me away from the 1x1 project long enough to forget where I was and what I had been doing.  It also led me to think more about other projects.  In overview, the 1x1 is much like my first engine, a Webster, in being a free running internal combustion engine.  I've started to get interested in engines that have RPM control - like a primitive cruise control.  The first such engines, called hit and miss engines, have a feedback mechanism that control the engine actually firing or not, so that when they're under load, they "hit" and fire more often than when they're under a lighter load - or no load - when they "miss" most of the time.  They deliver the required power when required.

I'm more interested in making one of those than another version of what I've already done. 

Then there's more.  Ever heard of an orrery?  These are essentially model solar systems, from the relatively simple to the unimaginably complex, whether machined metal like those two or 3D printed plastic like this one.  Include the incredibly simple - just the sun and one planet, like this.

This is a screen capture at around the last 10 seconds of an almost 19 minute video showing how everything here is made.  That's supposed to be the sun on the left and Earth and moon on the right. The motions of the Earth and moon are supposed to be scaled properly.  The big, light colored things are the thumb and fingers of the machinist, wearing surgical finger cots to keep from touching the brass gears and causing corrosion.  I'm guessing the entire thing is about a half inch from end to end.

So what's next?  I don't know.  The orrery appeals to my amateur astronomer and telescope maker side. The hit and miss appeals to my decades of designing electronic control systems or control loops. 


Saturday, April 5, 2025

And Now for Something Completely Different

It seems the day got away from me, as it appears the weekend might well also, so a totally unrelated, 3D printer story. 

Precious granddaughter (also known as PGD) officially turned into a teenager last month as the clock ticked over to 13.  One of the things we picked off her Christmas list this most recent Christmas was a Taylor Swift CD.  I have no idea how common that is for 13 year olds, but it was easy to do and she was happy to get it.  

Around the middle of January, I broke a plastic measuring teaspoon and thought "why not just print one?" so I found myself looking for models on a few sites.  That's when I stumbled across this, on the public print library at Prusa:

I asked Dear Daughter-in-Law if she thought PGD would like this, got an enthusiastic yes, downloaded the two files and since this was pretty much two full months before her birthday, promptly put it aside. 

When the calendar started getting into March, I setup the printer and did the large piece on the left and then went on to the more intricate piece on the right.  As the printer started getting closer to the end of the print, I could tell it was messed up in a way I'd never seen.  It looked like this:

Compare it to the view on the right in previous picture.  I have no idea why it turned some solid curves into dashed lines, but it clearly did.  The problem turns out to have been the Slicer software I was using, which is from Prusa, like the cookie cutter itself.  

I pretty quickly switched to another slicer software package I have and that one was much closer to the original.  I've since downloaded updated versions of both Slicers.

The two pieces were Priority Mailed to PGD and the first batch of cookies were had a couple of weeks ago.  To borrow/butcher a line, "a splendid time was guaranteed to all" and received by them.


Saturday, February 25, 2023

Totally Unrelated and Completely Different

Totally unrelated to and completely different from the usual fare that I fill these columns with, that is, but well within the things I fill my time with.  

I was offered this video the other day, and unlike 99.99% of the videos that YouTube offers me, I watched with interest.  A top-ranking manufacturer of 3D printers, Prusa, put out a video on how they printed an electric guitar body and made a playable guitar.  More impressive than that, they spent over a year on the project ensuring the guitar would survive the forces it lives under, and hold its shape.  They went into the choice of components, showed where they got the ones they used and an economical way of getting the parts to make it.

Now you may be saying, "are you going to make a one of these Fender Telescaster-clone guitars?"  While I don't want to rule it out completely, chances are I'm not going to.  It's the marginal utility function - to borrow the idea from economics.  Another guitar in the collection doesn't make my family of guitars that much more useful.  If you have one guitar, another one can bring a lot of useful differences.  Adding an acoustic guitar to an electric, or vice versa, opens a wider array of kinds of music you can make.  If you have one of both kinds, a different brand and model might still add different sounds to your repertoire  When you have a few of each kind, an additional guitar of either major type just doesn't return much for the investment.

When I went shopping for my 3D printer, I wasn't quite sure I wanted one around the house. While it seemed like an obvious thing to have when you think that a large portion of all the plastic things in our houses could be printed, there's that aspect of printers that they seem to be used for trivial things.  Can you even make useful things like they sell?  Because of that, I went with a cheaper, entry-level printer although I might look for a better one now.  Dear daughter-in-law, a research biochemist, knows they exist and has friends that own printers, but when we mentioned having one was taken aback.  All of her friends print the trinkets and little decorative things that are so widespread; nothing that was a usable tool or even something as simple as a box.  She asked about things we've done and was surprised that they were all practical things, like my 2" vacuum hose adapter or my battery connector.  I told her about the Thingiverse and the thing I use the most at a couple of times every day is the electric toothbrush holder that I printed last fall.  Not a trinket or decorative thing in the mix.


Saturday, October 9, 2021

A Little Shop Update

This is not an update to the 1 by 1 engine I've been tracking, at least not exactly.  I didn't do much to the cam shaft at all this week.  Last Saturday, I concluded my update by saying it should be done "tomorrow" - meaning last Sunday.  Nope.  

I did some more reading and decided the cylinder I'd been turning (more precisely called a journal bearing) needed to be not only reduced to the right diameter but almost left with a polish.  That means sandpaper.  I did some research and found that the most common way of getting sand paper into a place like that and minimize the chance of repeating my finger injury (or worse) is by gluing sandpaper to a Popsicle stick.  Well, there's two of us in this house and neither of us eats Popsicles so it became a question of how I got one.  

While sitting in the shop, I almost put my arm on my 3D printer when my brain said, "it's a plastic Popsicle stick maker."  And so began a week of misadventures.  A comedy of errors that, like most of them, wasn't funny at all.  

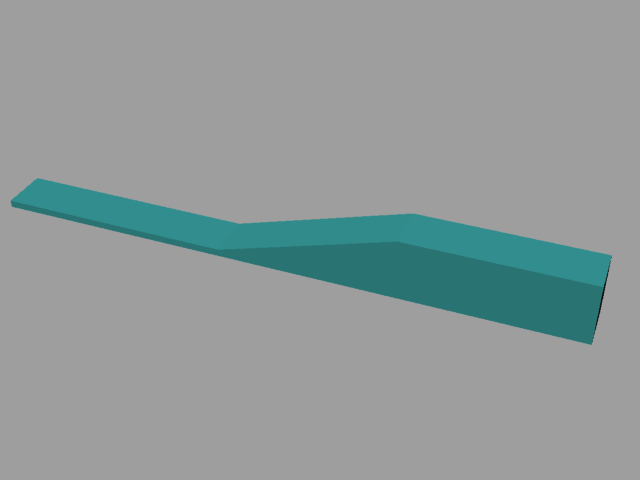
If I'm going to print anything, I need G-code file and to get that, I need a 3D solid model of a Popsicle stick.  This didn't take long, and I quickly made a version 1 of what I started calling the Fat Popsicle Stick - because I wanted to put a nice handle on it.  

The dimensions aren't there, but it's 5 inches long, the thick part of the handle is 1/2" tall, and the stick portion is 0.4" wide by 1/16" thick. That number was completely pulled from thin air.  I mean, I have had Popsicles, just not in the last 35 years or so.  They seemed about that thick.

So Tuesday it was time to print it.  The print failed.  I watched it for the first few minutes and came in to do other stuff during the remaining hour the print would take.  Just as I was about to go check on it Mrs. Graybeard came in to tell me the thin, stick part was off the table.  I went out to check it out and figure out what to do.  I thought about putting a spot of glue under that end and pushed on it to see how flexible it was.  When I did that, I popped the whole stick off the print bed.  No choice left but to kill the job.  

Except that it was about 3/4 done and probably usable.  So I gave it a try and found two problems.  First, it was too wide.  The design was 0.40, but it came out a little wider.  When I wrapped sandpaper on it, it was too close to the .438 of the journal.  The second problem was that it felt too flimsy.  

Within a few minutes, I had a redesigned "Ver. 2" stick ready to print.  I doubled the thickness of the stick portion to 1/8" thick.  Stiffness in bending here is proportional to the fourth power of the thickness, so doubling the thickness should make it 16 times stiffer.  The minor change was to drop  the width to 3/8".  

Except that I noticed before I left the first time that it looked like the right front corner of the print didn't look as opaque as it did farther away from that corner.  I ran one of these bed level tests like I did when I was getting set up to use the printer and it came out that the right front corner didn't print.  Time to re-level the printer bed.  Except I realized I didn't remember how to go through the process of leveling the bed, so I gave up for the day. 

Of the various channels I found on YouTube, the one I think I got the most from was CHEP, so I went to his channel, searched on bed leveling, and found a video that was dated a month ago. Obviously not the one I watched back last January, but I watched it and thought it was a big improvement over the way I did it. The main difference is that the previous video is based on sliding a piece of paper out from under the print head while this one is based on a feeler gauge.  The 3D printed gun guys stress doing a better layer thickness calibration and I think they talked about using a feeler gauge. 

To do this calibration, I needed to load some new firmware onto my printer, which required that I verify which processor board revision I have.  I'd been meaning to do both of those things anyway.  

With the new firmware and the bed leveled, it was time to print the revised design.  Except that I hadn't put the Rev. 2 model's G-code on my memory card and printed Rev. 1. OK, time to really print Rev 2 and very quickly found a problem.  The G-code was having it print the 1/8" thick part but left it the original 1/16" in the back.  Then it went back to print the handle on top of that thinner area and it didn't even attach to it.  A real mess.  I ended up with two parts not really attached to each other. 

Between the first layers looking thin, and the layers not bonding well when I printed the squares to check the bed level, I started to doubt this brand new yellow filament.  So I removed it and put in the other new spool of PLA+ filament I have, this one white.  I started printing with that and then broke for dinner.  After eating I went to check it and found it had printed the bottom half of the 1/8" thick part and then got lost.  The extruder went the width of the stick up in Y and some random offset to the right in X.  Totally FUBAR.  It left me puzzling over which piece of software screwed up or if it was the printer hardware.  There's three possible sources of software errors: the new firmware in the printer, the slicer software that creates the G-code, or it could be that my CAD model had defects I can't see.  

I decided to start everything over from scratch, except for leveling the bed.  I redrew the model and sliced it with the other slicer software I have but switched away from, Cura.  That required me to convert the model to metric in Rhino.  That's not hard, just more to do and not having to do that is one reason I switched to the newer (to me) slicer software, Prusa.  Then I started printing it again.  This one worked fine and was done in an hour.   

If you lost count, I had to print it three times to get one to come out right.  The one that came out in two pieces is usable, I had to cut off the loose filament and glue that one together.  I now have two of the sticks that I think will work and that's all I need.  One will get 400 grit glued to it and the other will be more like 1000.  Maybe.  Probably?

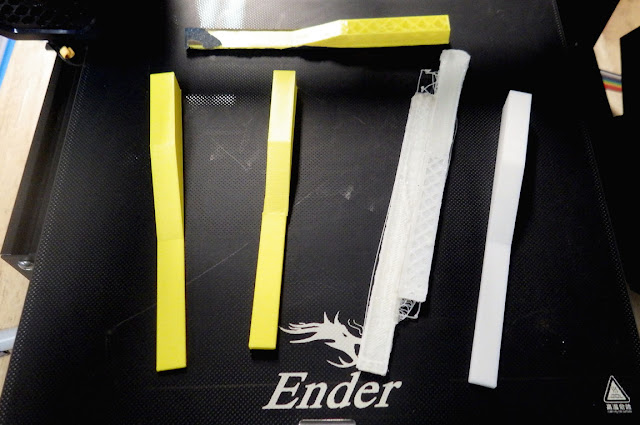
The Fat Popsicle Stick family.  In the back is the Rev. 1 stick that popped off the bed before it was done, but was usable - except for being too wide. It has 220 sand paper glued to it and I actually ran that on the journal for a little while.  The one on the left is the second Rev. 1 that I printed accidentally.  Second from left is the first Rev. 2 that printed in two pieces.  I shaved all the loops of filament off the bottom of the back's top piece and glued it to the bottom.  The odd looking white mess is what came out of the printer losing its X and Y coordinates.   The last one on the right is the finished Rev. 2 stick that printed properly.  

Back in March of '17, I quoted an article from Machine Design magazine, "Are 3D Printers Overrated?" in a post for those of us who don't have one.  The author's point was that you can buy a 2D printer (better known as an inkjet or laser printer) set it up and get great results instantly.  Go buy a 2D printer at your local office supply store and you'll be printing out grandma's recipes in less than an hour.  3D printing is still a much, much less established technology.  

I've had several prints that went without a hitch, but days like this week remind me of this guy's article.  Yet another thing I've been thinking of doing is building an enclosure for my printer, which is his first recommendation.