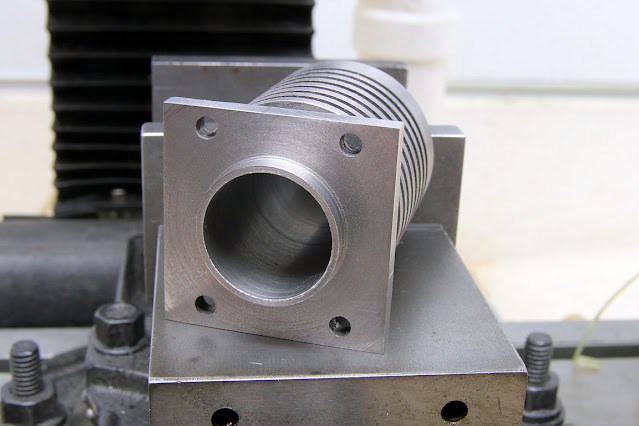
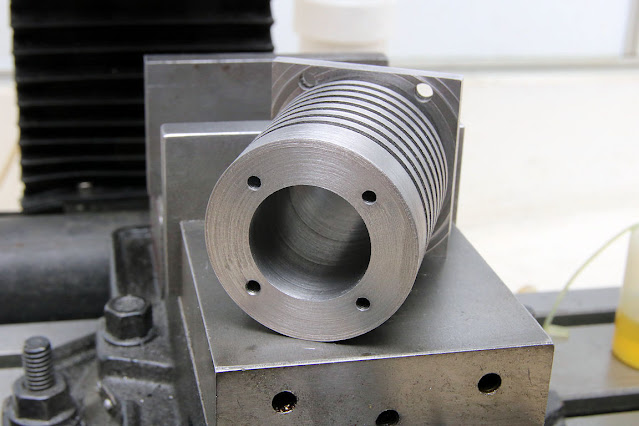
At the conclusion of last Sunday's post, I mentioned that the major work left was to add four holes on each end of the cylinder. The end with the square flange gets a rectangular layout of four holes; that is, not in a square pattern with each hole the same distances from the nearest corner in X and Y. Then there are four holes drilled and tapped for #5-40 screws in the other end to mount the cylinder head. That one is a square pattern. Both ends depend on the center of the bore being (0,0), so that if it's slightly oversized in some aspect, it won't move screw holes referred to those edges.
The square flange end where you can see the rectangular pattern,
and the combustion chamber end.
I have a tendency to tell myself "so you drilled eight holes and tapped four; that took you a week?" Naturally, I did other things. One of the things I wanted to do was to verify the numbers for inside diameter that I talked about in that post. It took me a long time to get numbers I was comfortable with and I wanted to cross check on the completed cylinder.
The big advantage is I can now use the telescopic gauge exactly the same way on both ends because I don't have to work from just the one end. I measured both ends from the end shown in the bottom picture. Now I can just turn the cylinder around and test from the other end.
The numbers I got testing both ends matched the previous numbers.
I need to point out that this isn't done, it's just being put aside while I work on the piston that mates with it. To do those tests, I'll also need to make the connecting rod. Plus, I need to order some hardware and the piston ring this engine specifies (a Vyton polymer ring).
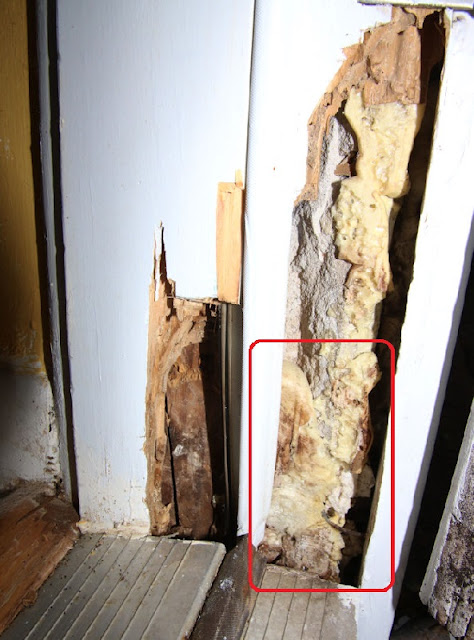
I've been slowed down by a home project that has expanded, fixing some rotten wood in a door frame. Like every time I've fixed some rotten wood on a boat, it's best to tell yourself "it's worse than you think" before you start, to minimize the disappointment. This is a picture of the bottom of the door frame at the point where I removed all the wood that felt rotten. The red rectangle shows the wood the area I started out expecting to work on. The light yellow stuff on the right is a spray foam insulation all the contractors use. I expect that to have zero strength.
It sucks up time and attention.
The cylinder looks very nice. I think your skills have improved since you first started building the little engines.
ReplyDeleteI get stuck with projects like that here, too. Simple job to paint the outside window frames in our sun room turned into a week long grind of blasting the old, peeling paint off with my orbital sander, then filling the imperfections, then sanding some more, then priming, then painting.
Always reminds of the old adage "Every 20 minute job is always ONE broken bolt away from being a three-day ordeal".
Thanks, man. I hope I'm getting better over time.
DeleteAlways reminds of the old adage "Every 20 minute job is always ONE broken bolt away from being a three-day ordeal".
And the corollary: there's always one bolt that wants to be difficult.
I would expect that the cylinder bore was made using a boring cutter on a lathe (or similar on a mill). Won't you need to smooth that out by lapping it with something like a brake cylinder hone, to get down to a smooth, glass-like final finish?
ReplyDeleteYou got it. That's most likely the next step.
DeleteI've successfully used this product or something very similar on indoor furniture legs that soaked up water from a leak on the floor. By the smell I suspect it is latex house paint minus any pigment or thickeners. It's very thin and penetrates in a way that PVA white glue or epoxy won't: PC Products / 16 oz. PC-Petrifier Wood Hardener [for rotted wood] / $9.75 at Home Depot
ReplyDeleteI used Varathane wood hardener, and it seems like good stuff. Definitely sinks in quickly and wood does get harder.
Deletehttps://www.homedepot.com/p/Varathane-16-oz-Wood-Hardener-340229/305626727
The cylinder project time reminds me of something we said a lot a my last IT job - there's never enough time to do it right, but always enough time to do it over.
ReplyDeleteThe version I took to heart: "If you don't have time to do it right the first time, what makes you think you'll have time to fix it?"
Delete